Award
Testimonials
"It does a great job. If you are looking for an image converter , it may be of help."
- Softpedia
"It is very easy to use.
It is very effective in what it does.
I am very happy!"
- Andrew MacArthur
Find Us
Hot Guides & Tutorials
How to Resize Images for Uploading to Web Albums
Web albums is a photo album viewer that lets you view your pictures and your friends’ pictures on web albums so that you can do without having to send emails to everyone with a ton of attachment. But the photos are too large to upload to the web album, how can you achieve this, especially when you have large amount of images, here you need a professional editing tool that could resize your large file images in one time and easy to upload to web album.
PearlMountain Image Resizer will allow you to upload your images to the web for free so that you can share them with family and friends. It offers the smartest and easiest way to resize images for uploading to web album in batch. Use this image resize tool to convert and resize high quality photos to upload for web album. Best of all, you and your friends can download your photos at the same high quality to print and enjoy. And you do not need professional skills, even new users will be able to resize images for web album in a couple of clicks, you just need to know where to find your photos and where to save all album files! The how-to tutorials below will show you how to upload your pictures to web albums using PearlMountain Image Resizer.
Download and launch PearlMountain Image Resizer.
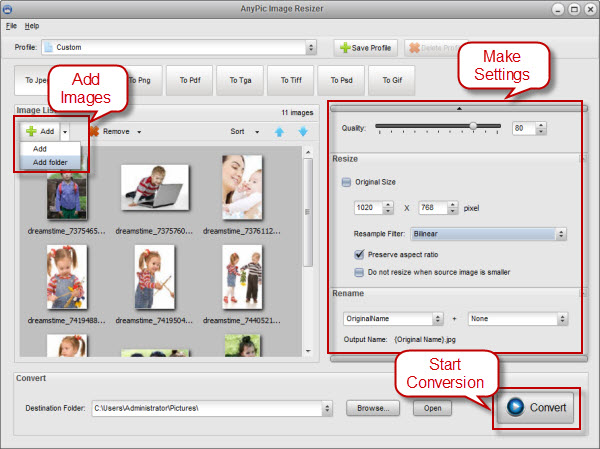
Step 1: Add Images
Select the images you wish to upload. Click “Add” button to add images.
Various photo formats are supported, including JPEG, TIFF, PNG and GIF, in the opened window browse for the needed images and press the Open button.All loaded images will be displayed in the Preview Area.
Step 2: Make Settings
Choose output format. Click one of the image output format buttons that you want your images to be converted to, such as JPG. The other formats, PNG, TIFF, PDF, etc, all have their corresponding settings.
Choose the size you wish to use for the images you upload. You have the option to choose Original Size or input certain size you want.
Enter a name for the images, when changing the name of images, you could see the Output Name will change as you input the name and suffix.
Step 3: Convert
After making settings, click “Browse” button to choose destination folder that is convenient for you to locate and use or you could save it in the original folder.
Then click the “Convert” button to generate your own photo to upload to the web album.
It's very simple to use PearlMountain Image Resizer to resize images for uploading to the web album, with this image editing tool, you can accomplish your tasks with only few mouse clicks, it's powerful! Especially you are a hobbyist and just want a way to share your pictures.
Related Software
PearlMountain Image Converter allows youto convert images to other formats, resize, rotate, crop, add watermark, apply effects and add border to thousands of images at a time. It supports the 60+ image formats, including the most popular ones: JPEG, BMP, TIFF, PNG, PSD, GIF, TGA, ICO, PDF, RAW and many others.
![]() Buy PearlMountain Image Converter ( $29.90 )
Buy PearlMountain Image Converter ( $29.90 )