Award
Testimonials
"It does a great job. If you are looking for an image converter , it may be of help."
- Softpedia
"It is very easy to use.
It is very effective in what it does.
I am very happy!"
- Andrew MacArthur
Find Us
Hot Guides & Tutorials
How to Adjust Image Effects in Batch
With the digital cameras available, photos can be produced easily, but sometimes the photos from the camera need to be edited before we can use it. As you know a beautiful photo with some flaws makes the photographer upset. However, the brightness, contrast and saturation can be adjusted in any image to make the colors of the image really come to life.
PearlMountain Image Resizer Pro can be effectively used for image editing in batch. It supports enough editing operations allowing you to create photos as high quality as possible. Using PearlMountain Image Resizer Pro to adjust the brightness, contrast and saturation of images in batch is quite easy. In the following tutorial, you’ll learn as easy as possible. The first thing to do is to download PearlMountain Image Resizer Pro and launch this program.
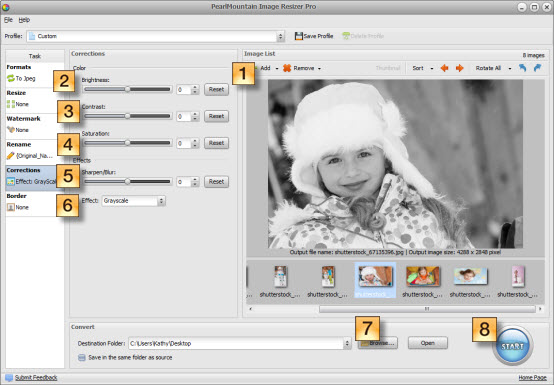
Step 1: Make Setting
Before adjusting effects the photos, you need to add photos and select one format you want your photos to be converted to, you can also adjust the size, create a name and add image or texture watermark to them.
Step 2: Adjust Brightness
To do that you’ll need to switch to the Corrections tab. Brightness is used to adjust the relative lightness or darkness of the color, as you drag the slider with the value in the box changes, you can preview the color effect of image also changes as the same time. Another way to change the brightness is entering a value into the box. To reset the original value use the Reset to Default button.
Step 3: Adjust Contrast
Contrast is used to change the relationship between the lighter and the darker areas, increasing the Contrast means increasing the difference between light and dark areas. This will make the darker areas darker, and the lighter areas lighter. Moving the slider to the right increases contrast throughout the image, to left decreases contrast. You can adjust the contrast by dragging the slider or entering a value into the box. To reset the original value use the Reset to Default button.
Step 4: Adjust Saturation
This is used to adjust the color saturation and lightness of your images. In the dialog box, drag the Saturation slider to define the intensity of the colors. The saturation various from -100 to 100, to reduce color saturation, drag the slider to a number less than 100. -100 represent no color, which makes an image black and white. To reset the original value use the Reset to Default button.
Step 5: Apply Blur and Sharpen
This is used to reduce Blur or increase Sharpen contrast of images. You can do that by dragging the slider or entering a value into the box next to it. To reset the original value use the Reset button.
Step 6: Apply Effect
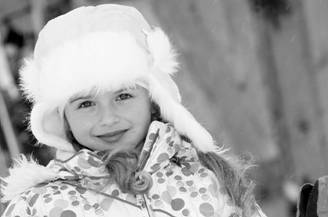
The effect gives your images a classic look with black and white colors. To apply of this special effect use the Effect drop-down list and select Grayscale. If you do not want apply effect select the Original Photo option.
Step 7: Select Destination Folder
Click the Browsebutton next to select the Destination Folder to save your adjusted images on your computer.
Step 8: Convert
Click Conversion button to start conversion progress. After conversion, all your images can be found in the destination folder.
Original image

Output image
Related Software
PearlMountain Image Converter allows youto convert images to other formats, resize, rotate, crop, add watermark, apply effects and add border to thousands of images at a time. It supports the 60+ image formats, including the most popular ones: JPEG, BMP, TIFF, PNG, PSD, GIF, TGA, ICO, PDF, RAW and many others.
![]() Buy PearlMountain Image Converter ( $29.90 )
Buy PearlMountain Image Converter ( $29.90 )