Award

Testimonials
"It does a great job. If you are looking for an image converter , it may be of help."
- Softpedia
"It is very easy to use.
It is very effective in what it does.
I am very happy!"
- Andrew MacArthur
Find Us
Hot Guides & Tutorials
How to Batch Convert Camera Raw Images to JPEG
The RAW file format is digital photography's equivalent of a negative in film photography, it contains untouched, "raw" pixel information straight from the digital camera's sensor, it contains just one red, green, or blue value at each pixel location. Do you have a lot of photos that you shot and edited in RAW format and want them to convert into JPG? And are you looking for a free and easy to use software that could meet your needs?
PearlMountain Image Resizer supports image format conversion of Camera Raw to JPG, which has a powerful image processor that can automatically convert these files for you. and It's a fast and easy-to-use image conversion tool for both amateur and professional photographers to deal with digital photos. PearlMountain Image Resizer can convert your images in batch. The following steps will tell us on how to convert Camera Raw to JPG format.
Firstly, download and launch PearlMountain Image Resizer.

Step 1: Add images
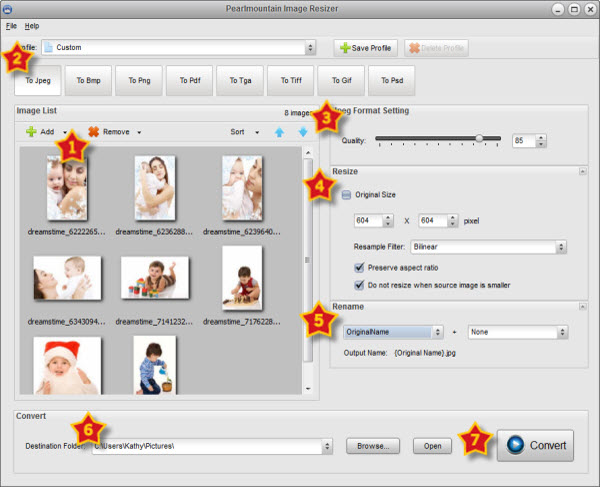
First, you need to select all of the files that you want to convert from RAW to JPG. Click Add button to add images, in the opened window browse for the preset files and choose camera RAW in the drop-down list from Files of type and press the Open button. All loaded images will be displayed in the Preview Area.
Step 2: Choose Output Format
Press the To Jpeg button on the Conversion tab to set the output image format.
Step 3: Format Setting
Setting the image quality by dragging the Quality slider or input a number in the space behind the slider.
Step 4: Resize
You can keep it as Original Size or you can change the image size by change the numbers in the space below.
Step 5: Rename
When changing the name of images, you could see the Output Name will change as you input the name and suffix. Meanwhile, you could keep images as Original Name.
Step 6: Save
Next, you need to select the location where you want the new JPG images saved to. Choose a destination folder that is convenient for you to locate and use or you could save it in the original folder.
Step 7: Convert
Press the Convert button to start converting images. After conversion, a Raw to JPG image format can be found in the destination folder.
If you're going to batch convert anyway, PearlMountain Image Resizer in the first place will save your time and storage space, it’s really helpful and it is a good idea for you to convert image format using PearlMountain Image Resizer. Go ahead and give it a try right away.
Related Software
PearlMountain Image Converter allows youto convert images to other formats, resize, rotate, crop, add watermark, apply effects and add border to thousands of images at a time. It supports the 60+ image formats, including the most popular ones: JPEG, BMP, TIFF, PNG, PSD, GIF, TGA, ICO, PDF, RAW and many others.
![]() Buy PearlMountain Image Converter ( $29.90 )
Buy PearlMountain Image Converter ( $29.90 )