Award

Testimonials
"It does a great job. If you are looking for an image converter , it may be of help."
- Softpedia
"It is very easy to use.
It is very effective in what it does.
I am very happy!"
- Andrew MacArthur
Find Us
Hot Guides & Tutorials
How to Convert PNG to ICO
The ICO file format is an image file format computer icons in Microsoft Windows, ICO files contain one or more small images at multiple sizes and color depths. You may have noticed that most sites and blogs have little icons that appear next to the web address, and the little icons are ICO format. When you are going to give a graphical way of looking at icons but you find them in PNG format, as PNG is a wonderful format to store intricate image details, Windows doesn’t allow you to use them as icons, so the ICO file format is the most common used to look at icons.
How can you convert PNG to ICO, there are a bunch of image tools that let you upload a PNG file and convert it to a ICO file. PearlMountain Image Converter lets you convert between PNG and ICO formats in batch mode without losing any quality in a few mouse clicks.
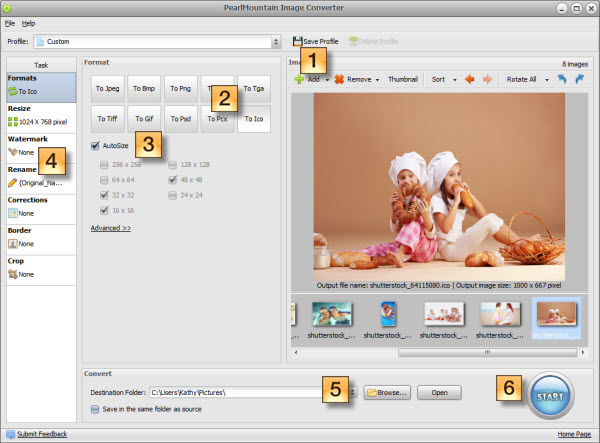
Step 1: Load Images
To start the conversion process, you should upload your PNG file. Click Add, Add Folder or Add form URL button to load images, or you could drag one or more PNG files on the preview window.
Step 2: Select Output Format
You’ll need to switch to Format tab, Click “To ICO” button to set the output format that you are going to convert to, and then the AutoSize will be displayed below automatically.
Step 3: Set Output Format Size
You can replace AutoSize by adding some other preset size. Select output size by yourself, the output size from 16x16 pixels, 24 x24 pixels, 32x32, 48x48 pixels up to 128x128 pixels in the ICO format. In addition, you can select 256 Colors as output file.
Step 4: Rename
Use Original Name to keep the original name of the image file. You can also customize the name of images and the Output Name will change as you inputting the text added with a chosen suffix. What’s more, this application allows you to resize, watermark, add border, apply corrections, and crop on images as well.
Step 5: Choose Destination Folder
When you have finished settings, browse for a destination folder to choose one destination folder, or you could save your file in the original folder by checking Save in the same folder as source.
Step 6: Convert
You are going to click Start to have converting process, wait a few seconds until the conversion of the current files is completed. After conversion, all the converted ICO files will be found in the destination folder, you can upload it to have proper use.
Related Software
PearlMountain Image Converter allows youto convert images to other formats, resize, rotate, crop, add watermark, apply effects and add border to thousands of images at a time. It supports the 60+ image formats, including the most popular ones: JPEG, BMP, TIFF, PNG, PSD, GIF, TGA, ICO, PDF, RAW and many others.
![]() Buy PearlMountain Image Converter ( $29.90 )
Buy PearlMountain Image Converter ( $29.90 )