Award

Testimonials
"It does a great job. If you are looking for an image converter , it may be of help."
- Softpedia
"It is very easy to use.
It is very effective in what it does.
I am very happy!"
- Andrew MacArthur
Find Us
Hot Guides & Tutorials
How to Add Border to Photos in Batch
Borders give your photos a unique look and make the photos stand out. It can be done easily and take no time to add it to the photos with an image tool. Border on a photo can make a big difference from the one that without it. You can add borders in batch to hundreds of photos without any difficulties by using PearlMountain Image Resizer Pro, follow these steps to make your photos look more professional. At the end of this easy and simple tutorial you'll be able to add a border to photo in batch, perfect for framing and displaying.

Step 1: Add Photos
Start PearlMountain Image Resizer Pro and open the image that you want to add a border to, select as many as you want, and then choose the output format, if possible, adjusting the size is also your choice.
Step 2: Adjust Simple Settings
Switch to Border tab. Check Apply Border box then the Simple settings are live, then you're going to decide how large of a border there should be around the photo. You can set the border parameters by choosing pixel or percent to change the width of the border, and the border color is black, which is set as the default color.
Step 3: Adjust Advanced Settings
Select Advanced tab. Choose the pixel or percent parameter to set the width of the border. To create a border around a certain section, decide how many pixels or percent of a border you want on each side, select the area you want and click the up arrow, you’ll see the border changes on the preview area. If you don’t like the default color, click down arrow key near the color box to choose the favorite color.
Step 4: Add Watermark to Border
If you want to upload photos to the web, you should protect them from being stolen, adding watermark to photos is available. Switch to Text Watermark tab, write down some words such as your company name, your website and so on, the watermark will be displayed on the photo automatically. Here you can increase the thickness of bottom border and place the text watermark on the bottom border.
Step 5: Select Destination Folder
Once finished adding borders, click Rename option to rename your photos, this will prevent you from saving over your original copy of the photo. Click the Browse button next to select the Destination Folder to save your photos on your computer.
Step 6: Convert
Click Conversion button to start conversion progress. After conversion, all your photos can be found in the destination folder. So, have fun and add a border to your photos.
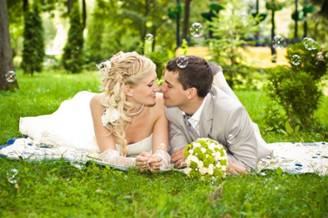
Original image
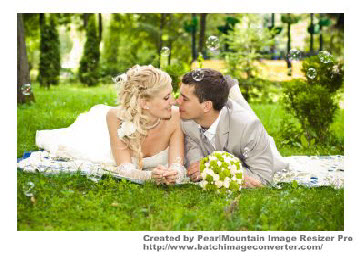
Output image
Related Software
PearlMountain Image Converter allows youto convert images to other formats, resize, rotate, crop, add watermark, apply effects and add border to thousands of images at a time. It supports the 60+ image formats, including the most popular ones: JPEG, BMP, TIFF, PNG, PSD, GIF, TGA, ICO, PDF, RAW and many others.
![]() Buy PearlMountain Image Converter ( $29.90 )
Buy PearlMountain Image Converter ( $29.90 )