Award

Testimonials
"It does a great job. If you are looking for an image converter , it may be of help."
- Softpedia
"It is very easy to use.
It is very effective in what it does.
I am very happy!"
- Andrew MacArthur
Find Us
Hot Guides & Tutorials
How to Add Text Watermark to Photo
If you upload your photos to the web and share with your friends, you never know what will happen, someone may copy and republish your artwork for any purposes without your permission. For this, adding watermark is an important way to protect your images from unauthorized copying and use. Here's a simple way to add a watermark with a perfect tool.
PearlMountain Image ReszierPro is a powerful and easy-to-use software, provides professional protection solutions for your digital photos, which allows your put text watermarks to your photos, protect their safety of copyright, avoid from unauthorized use. The tutorial below will show you how you can easily add text watermark to a whole folder of photos using PearlMountain Image Resizer Pro.
Step 1: Make Settings
To be able to add image watermark to photos you need first to load some photos, select the output format, resize and rename the photos.
Step 2: Add Text Watermark
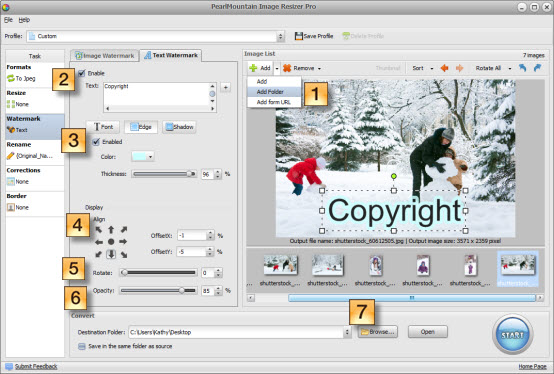
Switch to the Watermark tab and select the Text Watermark, check the Add Text box and type the text you need in the field next to it.
Step 3: Set Text Properties
The program allows you to set the text properties, adjusting the font and edge parameters. You could set the font, font color and font style properties. When turn to edge settings, check Enabled to allow the text edge displayed on, meanwhile, you can select the color and set the thickness of the text edge.
Step 4: Set Alignment
Simply choose any of the nine predefined alignment and the software will automatically puts your watermark at the correct position or you could drag the text watermark without releasing to the place where you want the watermark to be placed, in another way, customize offset by inputting numbers is also your choice.
Step5: Rotate
If you want to change the orientation of the text watermark, you can choose None, 90 Left, 90 Right and 180 Flip any rotate option.
Step 6: Adjust Opacity
You can also set the opacity of the text watermark transparency, which can differ from 0 with full transparency to 100 with no transparent color. You can view image result with the created watermark in the preview area.
Step 7: Select Destination Folder
Click the Browse button next to select the Destination Folder to save your images on your computer.
Step 8: Convert
Click Conversion button to start conversion progress. After conversion, your images can be found in the destination folder.
Related Software
PearlMountain Image Converter allows youto convert images to other formats, resize, rotate, crop, add watermark, apply effects and add border to thousands of images at a time. It supports the 60+ image formats, including the most popular ones: JPEG, BMP, TIFF, PNG, PSD, GIF, TGA, ICO, PDF, RAW and many others.
![]() Buy PearlMountain Image Converter ( $29.90 )
Buy PearlMountain Image Converter ( $29.90 )