Award

Testimonials
"It does a great job. If you are looking for an image converter , it may be of help."
- Softpedia
"It is very easy to use.
It is very effective in what it does.
I am very happy!"
- Andrew MacArthur
Find Us
Hot Guides & Tutorials
How to Protect Image Professionally
If you are sharing the images on the net, you never know what will happen. Maybe your images can be stolen for illegal use, at this time adding watermark is necessary. What’s worse, sometimes you are making a deal on the net and sending the photos to the customer, you must make sure all the images should be protected seriously, not only one part of image must be protected with watermark, but also all image parts. What you can do is fill the image with some text, making the image covered with text protection. This is a good way to protect your images professionally.
PearlMountain Image Converter has a powerful batch process function, which provides professional image protection solutions for you and avoid them from unauthorized use. It protects your image’s copyright professionally by adding image watermark, text watermark, logo to digital photos in batch mode. It is a fast and easy-to-use program.
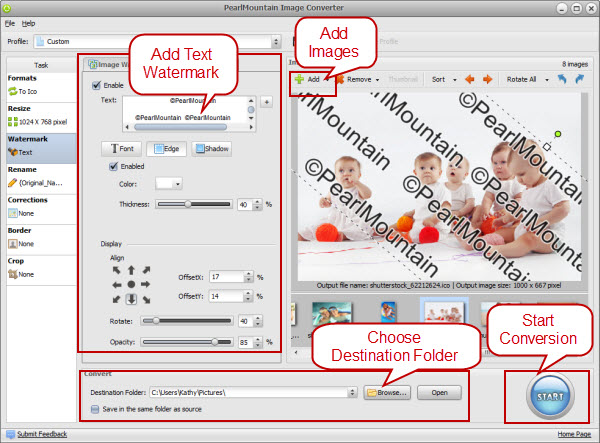
Step 1: Add Images
Download and launch PearlMountain Image Converter, click Add button to load the images you want to process, then all the loaded photos you’ll see in the preview area.
Step 2: Select Output Format
Switch to Formats tab, select one format you want your images to convert to.
Step 3: Add Watermark
Switch to Watermark tab, click Text Watermark, check Enable box, write down some words to cover the whole image such as company name, website, and signature, then the text watermark will be displayed on the image automatically. Rotate and position the watermark to look exactly the way that you want on images. Furthermore, the font and color of the text watermark can be changed, if possible, making some shadow effects on the text watermark is necessary, and don’t forget to change the Opacity of the image.
Step 4: Make other Settings
What’s more, this application also allows you to resize, add border, apply corrections, and crop images as well.
Step 5: Select Destination Folder
Browse for a destination folder to save output professional protected images, or check “Save in the same folder as source” to save the output images in the original folder.
Step 6: Convert
After finished all the settings, you can click Start to have conversion progress, then all your converted images with professional text watermark can be found in the destination folder. So, have fun to add watermark to your images.
Related Software
PearlMountain Image Converter allows youto convert images to other formats, resize, rotate, crop, add watermark, apply effects and add border to thousands of images at a time. It supports the 60+ image formats, including the most popular ones: JPEG, BMP, TIFF, PNG, PSD, GIF, TGA, ICO, PDF, RAW and many others.
![]() Buy PearlMountain Image Converter ( $29.90 )
Buy PearlMountain Image Converter ( $29.90 )