Award
Testimonials
"It does a great job. If you are looking for an image converter , it may be of help."
- Softpedia
"It is very easy to use.
It is very effective in what it does.
I am very happy!"
- Andrew MacArthur
Find Us
Hot Guides & Tutorials
How to Convert and Resize Photos for Facebook
Facebook is a social network service and website launched in February 2004 that is operated and privately owned by Facebook, Inc. As of January 2011, Facebook has more than 600 million active users. Users may create a personal profile, add other users as friends and exchange messages, including automatic notifications when they update their profile. Additionally, users may join common interest user groups, organized by workplace, school, or college, or other characteristics. The name of the service stems from the colloquial name for the book given to students in the US with the intention of helping students to get to know each other better.
As we all know, the large size photos we uploaded to the Facebook has some size limitation, if you want to enter Facebook and load your photos, you have to resize your photos first. So how can we resize photos to fit the size on Facebook, here you need a photo resizer/converter to realize your desire. Luckly, PearlMountain Image Resizer supports resize photos and convert image formats as well.
PearlMountain Image Resizer Free allows you to convert, resize and rename hundreds of images files in one time with a few mouse clicks. It's a fast and easy-to-use image conversion tool for both amateur and professional photographers to deal with digital photos. Facebook limits the size of uploading images to 604×604 pixel which is much smaller than the size of common digital photos. PearlMountain Image Resizer can batch resize your photos easily to fit the image size limitation of Facebook.
Here are the simple steps to convert and Resize Photos for Facebook, let’s get it started. Firstly, you should download and launch PearlMountain Image Resizer.
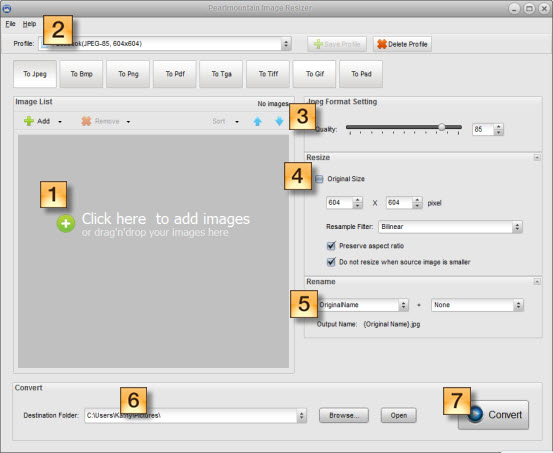
Step 1: Add images
Add images you want to convert for Facebook. You can either click the preview area or use the “Add” button to add images.
Step 2: Choose Output Profile
Click the “Profile” ComBox and select “Facebook (JPEG-85, 604×604)”, the format and resize settings will be set automatically.
Step 3: Format Setting
Set the image quality by dragging the Quality slider or input a number in the space behind the slider.
Step 4: Resize
The size has been automatically set to fit Facebook, you don’t need to change it.
Step 5: Rename
Use “Original Name” to keep the original name of the images. You can also change the name of images. The “Output Name” will change as you inputting rename text added with a chosen suffix.
Step 6: Save
Choose a destination folder for the converted images.
Step 7: Convert
Press the “Convert” button to start converting images.
After the conversion process completed, the converted images will be ready for Facebook. You can upload them to Facebook immediately and share with your friends as well as families.
Related Software
PearlMountain Image Converter allows youto convert images to other formats, resize, rotate, crop, add watermark, apply effects and add border to thousands of images at a time. It supports the 60+ image formats, including the most popular ones: JPEG, BMP, TIFF, PNG, PSD, GIF, TGA, ICO, PDF, RAW and many others.
![]() Buy PearlMountain Image Converter ( $29.90 )
Buy PearlMountain Image Converter ( $29.90 )