Award
Testimonials
"It does a great job. If you are looking for an image converter , it may be of help."
- Softpedia
"It is very easy to use.
It is very effective in what it does.
I am very happy!"
- Andrew MacArthur
Find Us
Hot Guides & Tutorials
How to Create Image Thumbnails
Thumbnails are reduced-size versions of pictures, used to help in recognizing and organizing them, serving the same role for images as a normal text index does for words. When you use thumbnails you can fit more graphics on one page. It’s really easy to pick and choose from all the graphics on the page and decide which ones you want to see. Creating a thumbnail is not hard and really doesn't take very long.
PearlMountain Image Resizer is free and simple to use image batch convert and resize software. It's not as comprehensive as something like Photoshop and some other software but it’s good enough for resizing. The following tutorial will describe how to create thumbnail images on the fly using PearlMountain Image Reszier. Furthermore you will learn how to process a whole folder of images and create their thumbnails.
Firstly, you should download and launch PearlMountain Image Resizer.
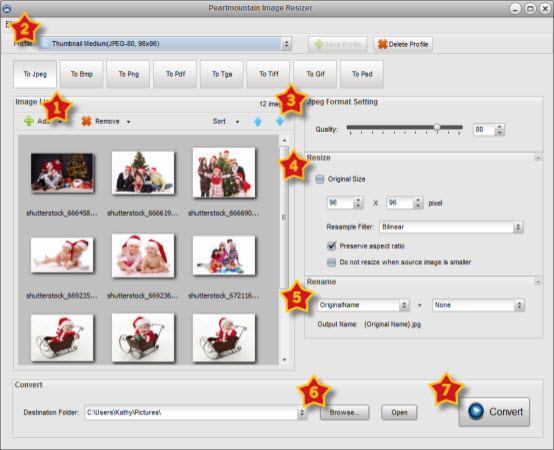
Step 1: Add Images
The first thing you are going to do is add image that you want to resize. You do this by clicking "Add" or “Add Folder” button, find the images on your computer and click the "Open" button to display all the images on the preview area.
Step 2: Choose Output Profile
Click the black arrow of “Profile” ComBox , you can see there are three different sizes of thumbnails are provide for you to choose, select any one of it, such as “Thumbnail Medium (JPEG-80, 96×96)”, then the format and resize settings will be set automatically.
Step 3: Format Setting
You could personalize the format seeing, set the image quality by dragging the Quality slider or input a number in the space next to the slider.
Step 4: Resize
The size has been automatically set to fit the thumbnails, so you don’t need to change it. Choose “ Preserve aspect ratio” to keep the width-length ratio of images.
Step 5: Rename
Use “Original Name” to keep the original name of the images. You could also change the name of images. The “Output Name” will change as you inputting rename text added with a chosen suffix.
Step 6: Save
Click “Browse” button to choose a destination folder for the converted images or save in the original folder.
Step 7: Convert
Press the “Convert” button to start converting images. After conversion, all the thumbnail images can be found in the destination folder.
If you are frequently browsing the Web, you will notice that many blogs are showing image thumbnails for the Related Posts section. Image thumbnails are used widely, with this free and fast software, creating images thumbnails can be so easy.
Related Software
PearlMountain Image Converter allows youto convert images to other formats, resize, rotate, crop, add watermark, apply effects and add border to thousands of images at a time. It supports the 60+ image formats, including the most popular ones: JPEG, BMP, TIFF, PNG, PSD, GIF, TGA, ICO, PDF, RAW and many others.
![]() Buy PearlMountain Image Converter ( $29.90 )
Buy PearlMountain Image Converter ( $29.90 )