Award
Testimonials
"It does a great job. If you are looking for an image converter , it may be of help."
- Softpedia
"It is very easy to use.
It is very effective in what it does.
I am very happy!"
- Andrew MacArthur
Find Us
Hot Guides & Tutorials
How to Convert a Mass of Images to Sony PSP
The Sony PSP is the first handheld video game console to use an optical disc format, Universal Media Disc (UMD), as its primary storage medium. Other distinguishing features of the console include its large viewing screen, robust multi-media capabilities, and connectivity with the PlayStation 2, PlayStation 3, other PSPs, and the Internet. Owning the Sony Playstation Portable (PSP) has many benefits due to their interconnectivity. Not only can you share files between them, but you can also use the PSP to supplement or even play some PS3 games. In addition, you could upload images to your Sony PSP so as to have a look them at any time and share them with your friend now and then.
PearlMountain Image Resizer lends you a helping hand with a proper and useful application that converts and resizes various image formats with the aim of uploading images to your Sony PSP, it allows you to convert, resize and rename hundreds of images files in one time with a few mouse clicks. PearlMountain Image Resizer can help you batch resize your images to fit screen resolution of Sony PSP.
Firstly, you should download and launch PearlMountain Image Resizer.
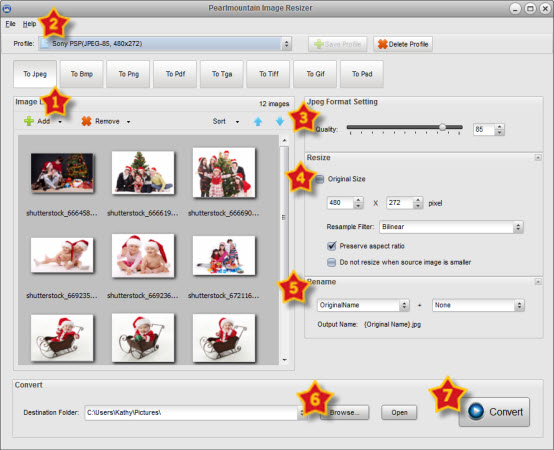
Step 1: Add images
The first thing you are going to do is add image that you want to resize. You do this by clicking "Add" or “Add Folder” button, find the images on your computer and click the "Open" button to display all the images on the preview area.
Step 2: Choose Output Profile
Click the black arrow of “Profile” ComBox and select “Sony PSP (JPEG-85, 480×272)”, the format and resize settings will be set automatically.
Step 3: Format Setting
You could personalize the format seeing, set the image quality by dragging the Quality slider or input a number in the space next to the slider.
Step 4: Resize
The size has been automatically set to fit the Sony PSP, so you don’t need to change it.
Step 5: Rename
When you change the name of images, the “Output Name” will change as you inputting rename text added with a chosen suffix. You could also use “Original Name” to keep the original name of the images.
Step 6: Save
Click “Browse” button to choose a destination folder for the converted images or save in the original folder.
Step 7: Convert
Press the “Convert” button to start converting images.
After the conversion process completed, the converted images will be ready for Sony PSP. You can upload them to the Sony PSP immediately.
Related Software
PearlMountain Image Converter allows youto convert images to other formats, resize, rotate, crop, add watermark, apply effects and add border to thousands of images at a time. It supports the 60+ image formats, including the most popular ones: JPEG, BMP, TIFF, PNG, PSD, GIF, TGA, ICO, PDF, RAW and many others.
![]() Buy PearlMountain Image Converter ( $29.90 )
Buy PearlMountain Image Converter ( $29.90 )